> ## Documentation Index
> Fetch the complete documentation index at: https://cubed3-alena-cub-2868-document-hierarchy-support-in-explore.mintlify.site/llms.txt
> Use this file to discover all available pages before exploring further.
# MCP server
> Connect MCP-aware assistants to Cube through a hosted HTTPS endpoint with OAuth and admin-managed defaults.
Cube MCP (Model Context Protocol) lets MCP-compatible AI clients connect to Cube over HTTPS using OAuth.
The MCP server is available on [Premium and Enterprise plans](https://cube.dev/pricing).
Users need the [Viewer][ref-roles] role or higher to interact with the MCP server.
## What is MCP?
Model Context Protocol (MCP) is an open standard that enables AI assistants to securely connect to external data sources and tools. The Cube MCP server acts as a bridge between your AI assistant and Cube's analytics platform, allowing you to ask data questions directly from your coding environment.
## Overview
Cube hosts an MCP server endpoint for your tenant. MCP clients connect over HTTPS and authenticate via OAuth.
* **Endpoint:** `https:///api/mcp`
* **OAuth discovery:** `https:///.well-known/oauth`
* **OAuth flow:** Authorization Code + PKCE, `client_id` = `cube-mcp-client`, scope = `mcp-agent-access`
* **Agent selection:** Uses the **MCP Defaults** (default deployment + agent) set by your admin
## Admin setup
### Prerequisites
Before enabling MCP, make sure you have:
* **Admin privileges** in your Cube instance
* An active Cube tenant
* MCP server URL configured
### 1) Confirm MCP server URL
MCP uses your Cube MCP server host. If the URL isn’t configured, the MCP page will show “MCP configuration is unavailable.”
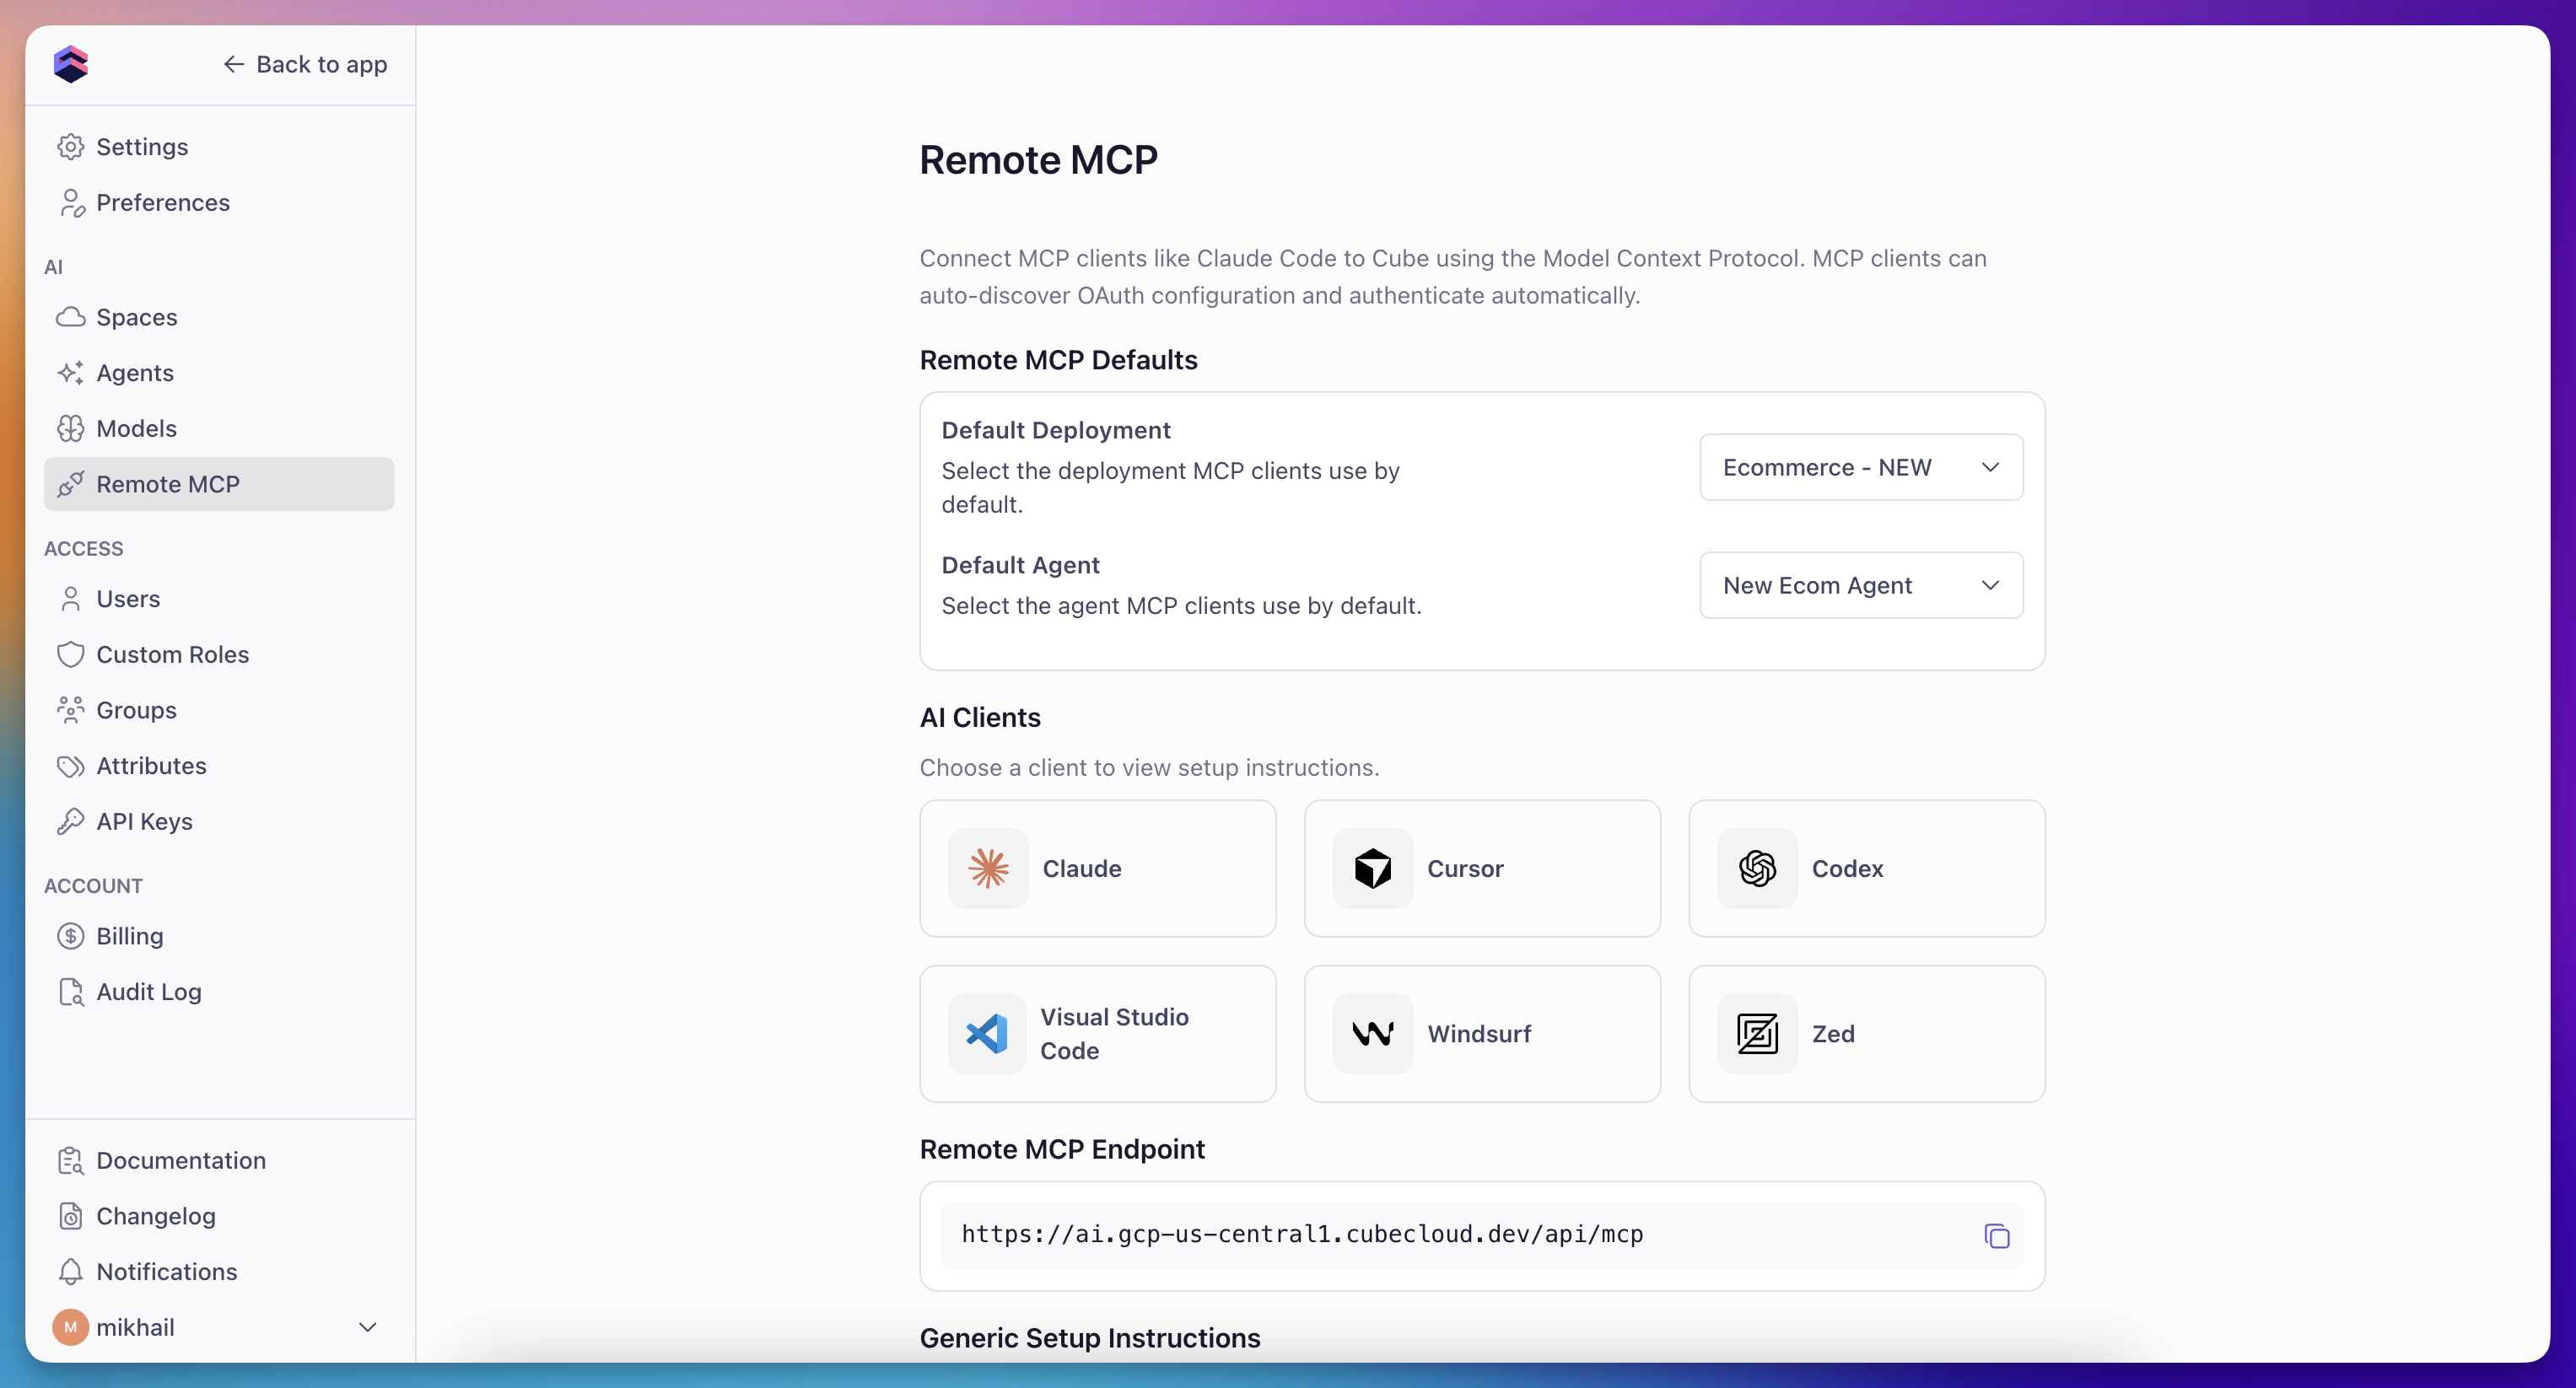
### 2) Set MCP Defaults
Go to **Admin → MCP** and select:
* **Default Deployment**
* **Default Agent**
These defaults are required for the OAuth token exchange.
 ## Connect to Claude
### Claude Code
```bash theme={"dark"}
claude mcp add --transport http cube-mcp-server https:///api/mcp
```
#### Authentication and usage flow:
1. Run the command copied from **Admin → MCP → Claude → Claude Code**.
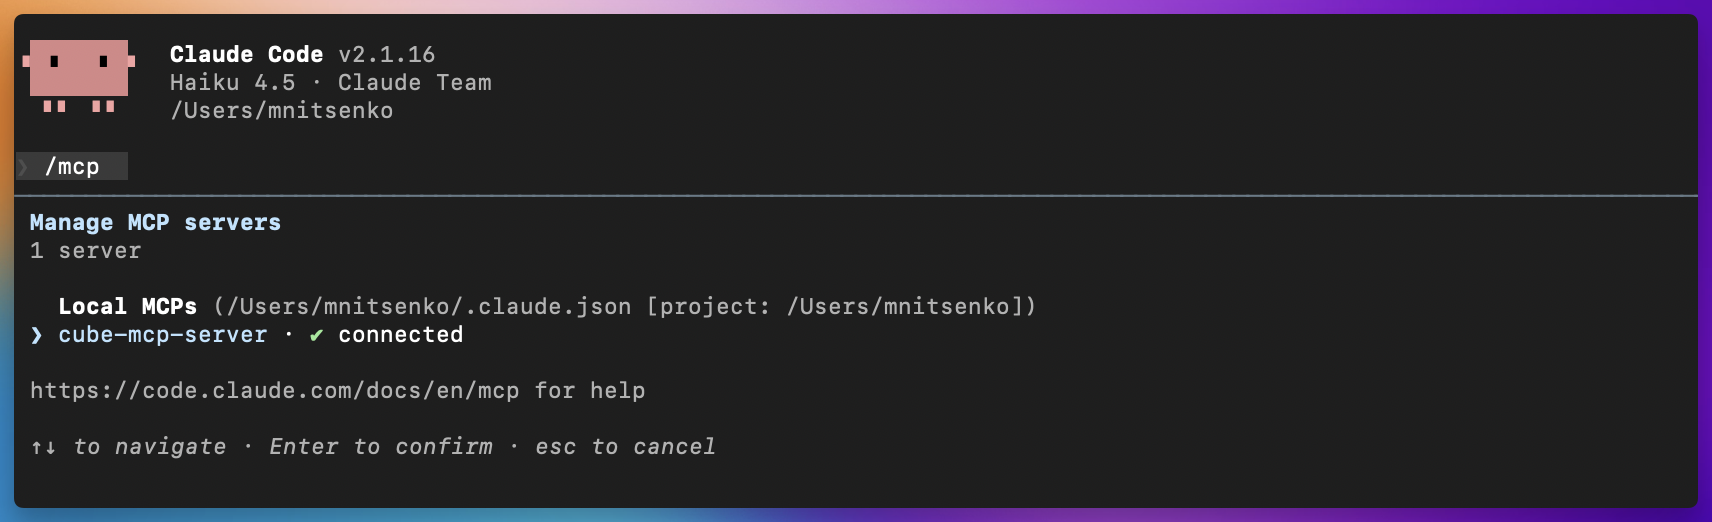
2. Then run Claude and use `/mcp` to list available servers.
3. Select `cube-mcp-server` and choose `Authenticate`.
4. A browser window opens for authentication.
5. Log into Cube and choose your tenant.
6. Return to Claude Code and start asking questions.
## Connect to Claude
### Claude Code
```bash theme={"dark"}
claude mcp add --transport http cube-mcp-server https:///api/mcp
```
#### Authentication and usage flow:
1. Run the command copied from **Admin → MCP → Claude → Claude Code**.
2. Then run Claude and use `/mcp` to list available servers.
3. Select `cube-mcp-server` and choose `Authenticate`.
4. A browser window opens for authentication.
5. Log into Cube and choose your tenant.
6. Return to Claude Code and start asking questions.
 ### Claude (Team/Enterprise)
1. Open Settings in Claude (web or desktop).
2. Scroll to **Integrations** and click **Add more**.
3. Use:
* **Integration name:** Cube MCP
* **Integration URL:** `https:///api/mcp`
4. Complete the OAuth flow to grant access.
5. Enable tools in any new chats.
#### Use Cube in Claude chat
1. Start a new chat in Claude.
2. Open the tools menu and enable **Cube MCP** (use the tools search if you have many tools).
3. Ask a data question. Toggle the tool off to disable it for that chat.
### Claude (Desktop app)
```json theme={"dark"}
{
"mcpServers": {
"cube-mcp-server": {
"command": "npx",
"args": ["-y", "mcp-remote", "--transport", "http", "https:///api/mcp"]
}
}
}
```
## Connect to Cursor
Add the MCP endpoint under Tools & MCP Settings, then complete the OAuth flow.
```json theme={"dark"}
{
"mcpServers": {
"cube-mcp-server": {
"command": "npx",
"args": ["-y", "mcp-remote", "--transport", "http", "https:///api/mcp"]
}
}
}
```
## Connect to Codex
Preferred (CLI):
```bash theme={"dark"}
codex mcp add cube-mcp-server --url https:///api/mcp
```
If this is your first time using MCP in Codex, enable the feature in `~/.codex/config.toml`:
```editorconfig theme={"dark"}
[features]
rmcp_client = true
```
Manual setup:
```editorconfig theme={"dark"}
[features]
rmcp_client = true
[mcp_servers."cube-mcp-server"]
url = "https:///api/mcp"
```
Then run `codex mcp login cube-mcp-server` to authenticate.
## Connect to other MCP clients
For any MCP-compatible client:
1. Add a new server with the **MCP endpoint**.
2. The client will auto-discover OAuth and prompt for authentication.
3. Complete the OAuth flow to grant access to your Cube deployment.
## Available actions
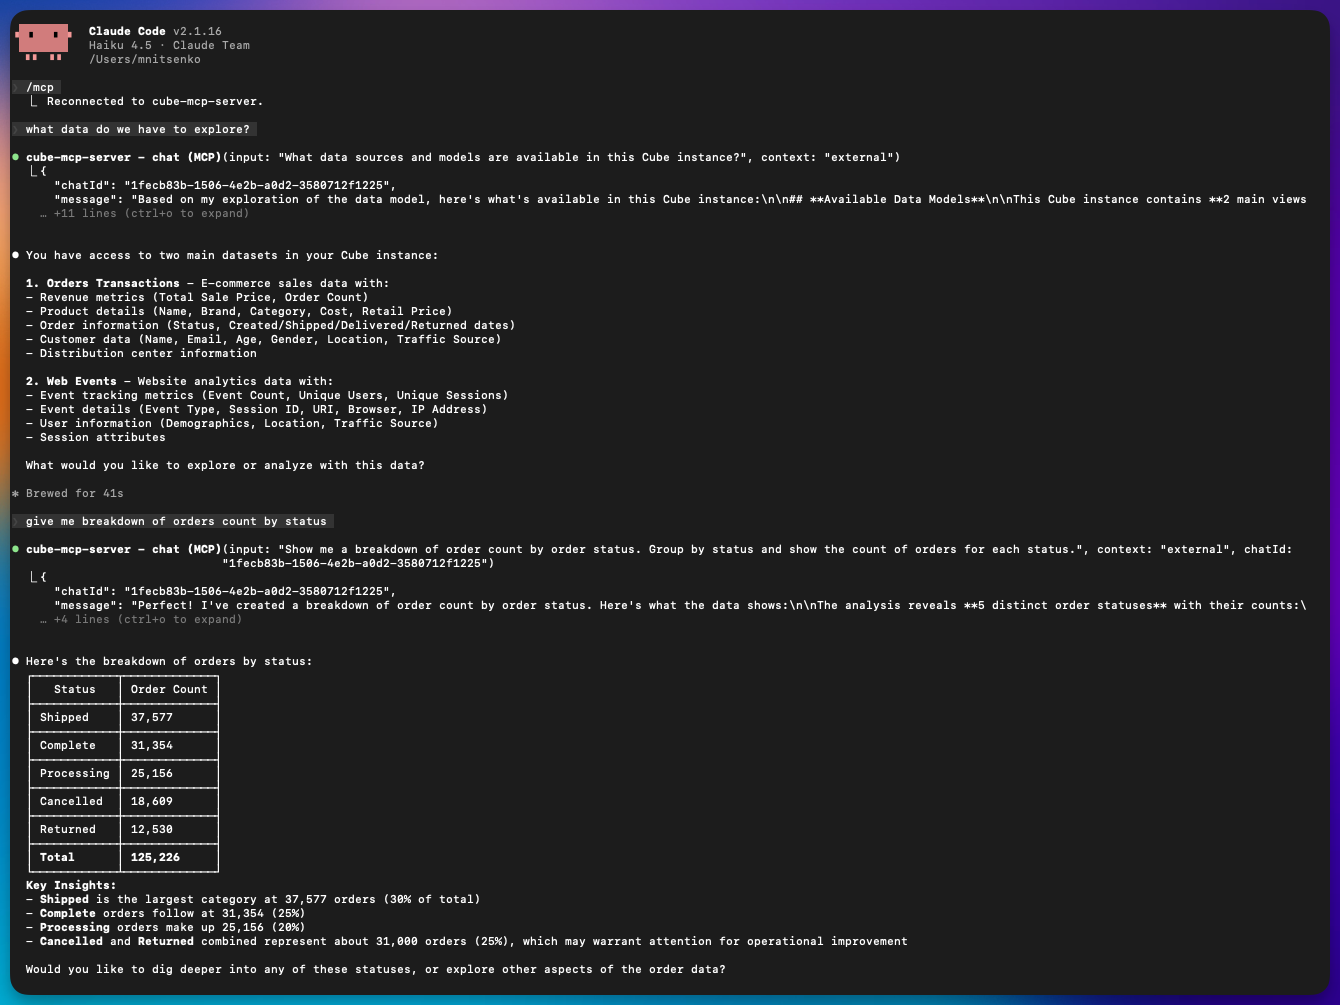
* Chat with your Cube AI agent over MCP
* Query data and request analysis
* Receive responses directly in your MCP client
## Example workflows
* Ask a data question in natural language
* Get SQL generated by the agent
* Request summaries, trends, and insights
### Claude (Team/Enterprise)
1. Open Settings in Claude (web or desktop).
2. Scroll to **Integrations** and click **Add more**.
3. Use:
* **Integration name:** Cube MCP
* **Integration URL:** `https:///api/mcp`
4. Complete the OAuth flow to grant access.
5. Enable tools in any new chats.
#### Use Cube in Claude chat
1. Start a new chat in Claude.
2. Open the tools menu and enable **Cube MCP** (use the tools search if you have many tools).
3. Ask a data question. Toggle the tool off to disable it for that chat.
### Claude (Desktop app)
```json theme={"dark"}
{
"mcpServers": {
"cube-mcp-server": {
"command": "npx",
"args": ["-y", "mcp-remote", "--transport", "http", "https:///api/mcp"]
}
}
}
```
## Connect to Cursor
Add the MCP endpoint under Tools & MCP Settings, then complete the OAuth flow.
```json theme={"dark"}
{
"mcpServers": {
"cube-mcp-server": {
"command": "npx",
"args": ["-y", "mcp-remote", "--transport", "http", "https:///api/mcp"]
}
}
}
```
## Connect to Codex
Preferred (CLI):
```bash theme={"dark"}
codex mcp add cube-mcp-server --url https:///api/mcp
```
If this is your first time using MCP in Codex, enable the feature in `~/.codex/config.toml`:
```editorconfig theme={"dark"}
[features]
rmcp_client = true
```
Manual setup:
```editorconfig theme={"dark"}
[features]
rmcp_client = true
[mcp_servers."cube-mcp-server"]
url = "https:///api/mcp"
```
Then run `codex mcp login cube-mcp-server` to authenticate.
## Connect to other MCP clients
For any MCP-compatible client:
1. Add a new server with the **MCP endpoint**.
2. The client will auto-discover OAuth and prompt for authentication.
3. Complete the OAuth flow to grant access to your Cube deployment.
## Available actions
* Chat with your Cube AI agent over MCP
* Query data and request analysis
* Receive responses directly in your MCP client
## Example workflows
* Ask a data question in natural language
* Get SQL generated by the agent
* Request summaries, trends, and insights
 ## Troubleshooting
* **MCP configuration is unavailable**: Configure the MCP server URL.
* **MCP OAuth integration is not configured**: Enable MCP in **Admin → Team & Security → OAuth Integrations**.
* **MCP defaults are not configured**: Set defaults in **Admin → MCP** under **MCP Defaults**.
[ref-roles]: /admin/users-and-permissions/roles-and-permissions
## Troubleshooting
* **MCP configuration is unavailable**: Configure the MCP server URL.
* **MCP OAuth integration is not configured**: Enable MCP in **Admin → Team & Security → OAuth Integrations**.
* **MCP defaults are not configured**: Set defaults in **Admin → MCP** under **MCP Defaults**.
[ref-roles]: /admin/users-and-permissions/roles-and-permissions